diy

Terry's Chocolate Orange Cheesecake

Sunday, 26 July 2020

Terry's Chocolate Orange Cheesecake

Sunday, 26 July 2020


During lockdown and furlough, I have done nothing but bake my heart out. I don't think I have ever really done a cooking/baking blog post at all. I am awful when it comes to baking to be honest, especially cakes. Even when following the recipe, it never seems to turn out right. However, I love to cook. I love to try new recipes and find new, favourite meals to switch up what I eat. I decided to make Dad a birthday cheesecake, instead of a birthday cake.. It went down really well, so I thought to share the recipe with all of you. This recipe could be easily changed, to suit your chocolate needs or favs. 

>This< is the recipe that we used. Super simple to follow, although we did tweak it a little bit, to make the cheesecake with a bit more flavour and a little bit of a twist. The recipe was found on Pinterest, there were SO many other ones that looked insane, but the method for this one, just seemed the most simple. 


What you will need: 
75g of unsalted butter
150g of digestive biscuits
200ml of double cream
500g of cream cheese, at room temperature
100g of icing sugar
1 baking tin (we bought one from Morrisons that was £3 and had a bottom that you could push up to make it easier to get out once set)

We decided to add:
1 whole orange
1 Terrys Chocolate Orange
1 bag of Mini Terry's Chocolate Orange


1. Line the baking tin with grease proof paper.
2. Make the base - crush the biscuits into a crumb (we used to end of a rolling pin). Melt the butter and combine. Press this mixture firmly into the bottom of the baking tin, and then chill. 
3. We then melted over a pan of boiling water, a few segments of Terry's Chocolate orange, once melted. Leave to cool on the side. 
4. Add the cream cheese, icing sugar and double cream into a bowl, and whisk together until stiff. We then zested the orange and added the juice of 1 orange into the soft cheese mixture. 
5. Add this mixture into the baking tin, on top of the biscuit base. Drizzle the melted chocolate over the top in any way you wish. 
6. Chill for at least 6 hours. 
7. Once chilled and ready to eat, decorate as you wish with the remaining Terry's Chocolate Orange segments. 


It was heavenly. Couldn't quite believe that we had actually made something that was this nice! We made a white chocolate and raspberry cheesecake yesterday too and I can't wait to see if that one matches up to how good this one was. 
If you do recreate this recipe, I would love to see it!

Have you baked or cooked anything new recently?
Amber X

DIY | Pressed Flower Frame

Sunday, 12 July 2020

DIY | Pressed Flower Frame

Sunday, 12 July 2020


The art of pressing flowers and displaying them in a frame has always been something that I have thought was a really lovely way of adding a little extra bit of life to a wall or space. I got a lot of my inspiration for this from Pinterest and Instagram accounts where people had made their own pressed flower arrangements. Unfortunately, during lockdown we have had our fair share of sad news, and I wanted to make something special to remember a beautiful lady who had the most gorgeous garden. We visited a few weeks back, and to make the memory that bit more memorable, Sam and I chose some flowers from her garden and decided to press them. 


We started with 2 thick and heavy, hardback cover books. I placed the flowers between the middle pages, on some newspaper and shut the books. We kept them in a dry and cool area, to dry out. To ensure that there was enough pressure from the books to flatten the flowers, and to take the moisture out of them, we topped the 2 books with further books and heavy objects.

I checked on the flowers daily, to ensure that they were all flattening, and alternated any the needed extra pressure applied. We pressed the flowers for 2 weeks. I read online that you should/can press them for 4 weeks to ensure that all moisture is gone, but we decided that after 2 they looked ready to be put into the frame. 


I chose >this< Amazon frame, instead of the popular gold edged hanging glass frame. I'm so pleased that I chose this one. It looks modern and I love how you can't see any of the back stand when it is up right. I carefully took the flowers out of the books on their newspaper, and placed the newspaper flat on the floor. 

Arrange the flowers how you wish, and trim to size if needed. Once I was happy with how the layout was looking, I attached the back, and there you have it. Our gorgeous framed flowers, as a reminder of the beautiful nature of a special lady. 


I love little DIY projects, and plan on doing more as time goes on. I am so happy with how this one has turned out.

Have you made anything recently?
Amber X

A Summer Tipple

Sunday, 5 July 2020

A Summer Tipple

Sunday, 5 July 2020


Happy July everyone. Where is this year going?! Lockdown has allowed me to put time into creating new meals and drinks at home. I miss eating out and trying new things, and I'm sure that some of you are missing happy hour and 2 4 1 on cocktails.. or failing that, missing treating yourself to a few cocktails lounging around the pool, or relaxing on the beach, whilst on holiday. Likewise. The other weekend, Sam and I had a go at bringing the cocktails home. Since creating these yummy Raspberry Mojito's I have purchased more cut glasses to enjoy our own creations in. I can't wait for the weather to pick back up, so we can try out some more cocktail recipes. 


What you will need to recreate these Raspberry Mojito's at home:
- Ice
- Raspberries (handful)
- 2 Limes
- Tonic water, or soda water whatever your preference is
- Fresh mint
- White rum (or you can cheat like we did and use a can of raspberry mojito haha)
- Sugar syrup (not needed if you use a pre brought can)


To start, we crushed up some raspberries into the bottom of our chosen glasses. Sliced up some lime, and squeezed fresh lime juice into the bottom of the glasses with the crushed raspberries. Next, we added lots of ice and poured over some tonic water. Usually in a mojito soda water is added, but we had to improvise. Using a spoon, we mixed these ingredients together. We then added a can of raspberry mojito that we purchased from Morrisons.. cheating I know, but it saved us the hassle of trying to find some sugar syrup. To finish it off, we added fresh mint from the garden, and some small slices of lime as a garnish. Pop in a few straws and it's done! So refreshing and full of flavour.


What restaurants have you missed visiting in lockdown?
Amber X

DIY | Scrapbooking

Saturday, 11 April 2020

DIY | Scrapbooking

Saturday, 11 April 2020


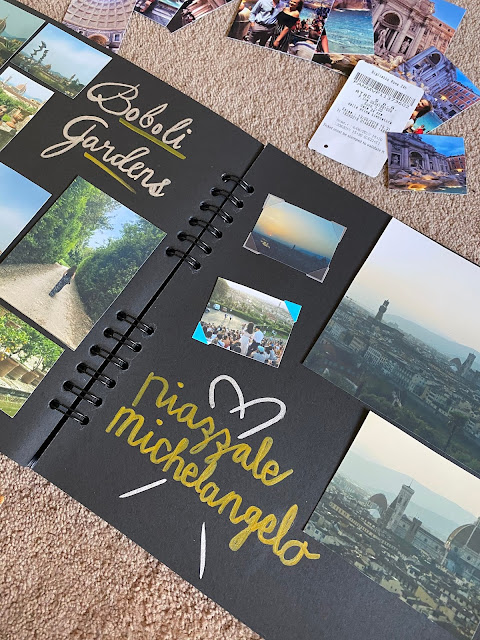
Scrapbooking has kept me sane whilst staying at home since Boris issued this lockdown. I am so grateful to have spent so much time in different places last year, and to have had collected little moments from our holidays, to look back on for years to come. I started this scrapbook about a year ago now, but have had many gaps to fill, and other page spreads to create. This extra time has definitely allowed me to be more creative with it, and really take my time in documenting our holiday memories.


 This scrapbook came from Amazon, with the book itself, some gorgeous metallic pens in differing colours and with differing sized nibs, some stencils to add doodles to your pages, and some lovely corner stickers, to stick down each corner of your photos. I took to Pinterest for some inspiration on how to lay out the pages, and also how to handletter some beautiful page titles for each place that we visited. I have really enjoyed going back to a school mentality of cutting and sticking, and also, going back through photos from previous holidays. I can't wait until it's finished. Definitely going to be living on a coffee table in my future home. 

It could be a lovely way to document what you got up to with your family in this lockdown, or what you have scheduled for the kids to do whilst the schools have been closed, or simply, like I have, go through those holiday photos and remember those happy memories. 


I can't wait for this to all come to an end, and for life to resume as normal.

What have you been doing to keep yourself busy?
Amber X

New Furniture Addition

Saturday, 25 January 2020

New Furniture Addition

Saturday, 25 January 2020


Moving furniture around in your bedroom, or repainting the walls, or even moving a photo frame from one place to the next can be such an exciting task. I used to love going through my drawers as a child, rearranging it all so everything has it's place. That being said, I'm not a child anymore and have been wanting for the longest time to change up my bedroom, and I have been slowly but surely been finding new bits of furniture or expanding my ideas about what furniture I have been wanting to add and remove from my room. I still live at home with my Dad who doesn't want me painting any of the walls, or fixing anything to the walls. Fair enough, his house, his rules. With that in mind, I have slowly, finally made my bedroom more to what I want it to be. 


I started a couple of years back with getting the Ikea Malm table, where my makeup sits, and this acts as a dresser in the corner of my room. I removed an old 3 drawers set that had two corner shelves fixed within the unit. Next change was getting rid of my single bed with it's horrible wooden frame, and Dad brought me a white Ikea double bed, as a joint Christmas and birthday present. 


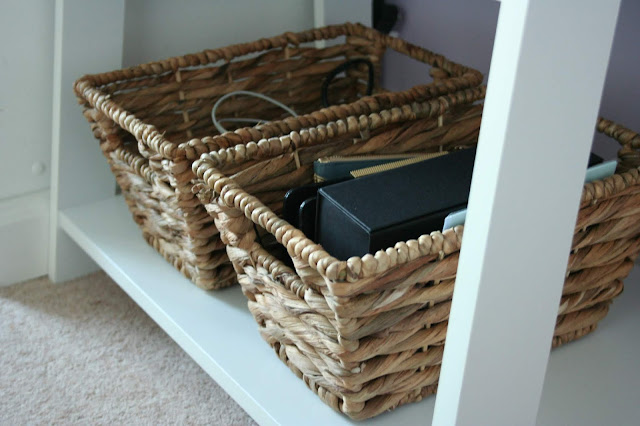
The latest edition to my bedroom are these amazing, free standing ladder shelves. I am obssessed! I have been looking for such a long time for the perfect set of shelves, that don't need to be fixed to the wall and that are tall enough to have a fair number of shelves within them. I am yet to style the shelves out completely how I want them to be, but I cannot wait to style them different with each season, and add some seasonal touches to them. It's such a lovely way to display certain pieces without having to have the commitment of fixing shelves to the walls, and also, means it can be moved around as you so wish. A dream.


Wicker baskets - TKMaxx - £15 for the three 
Blue pots - TKMaxx - £4 each 
Grey pot - TKMaxx - £4 each

Now to persuade my Dad to let me repaint my walls haha. What new addition do you want to add to a room of yours?
Amber X

Candle Making with ByLauraLondon

Saturday, 18 January 2020

Candle Making with ByLauraLondon

Saturday, 18 January 2020


I love candles as much as the next person. I'm forever wondering into TKMaxx or The White Company, running over to the candle section, frantically grabbing the first one I see, taking off the lid to inhale the scent to decide whether it would be one for me or not. It's in that instant where you can make the judgement as to whether the scent is one you love or one you hate. I love a cosy scent, lots of vanilla, or something fresh. The really sickly sweet scents are a no no. As are the scents that hit the back of your throat in a really not nice kind of way. I'm sure you know what I mean. So when Sam ever so kindly treated me to a candle making workshop for Christmas, I was so excited. The candle workshop was hosted and planned ByLauraLondon, based in her home in Surrey, where all her candles are home made and hand made.

I didn't really have any knowledge going into the workshop about how candles are made, what gives them their scent, how to mix scents together to create something amazing, what the expression "throw" means, what ratio of scent is to be added to the amount of wax that you're using, what is the best wax to use, or how to even care for a candle properly before and after you burn them. Laura's workshop was filled with all of the answers to these questions and really let all 7 of us into what it's all about to make a lovely smelling candle.


After a little introduction and a 'how to make a candle' chat, we were able to smell some of the essential oils that were on selection, and to think about which ones we would like to combine, or simply use by themselves to create one of two of our own little candles. Upon following the steps and demonstrations by Laura, I chose vanilla, bergamot and cinnamon in my first candle. As I said, I'm a fan of a cosy smell - something you could burn of the coffee table by the sofa, or one that could be burnt in the corner of the room before bed. This one is perfect for that. The second candle scent I chose to make was a bit of an experimentation really. I went for pine, a smell that I love and makes me think instantly of Christmas, added a little pink peppercorn, and finally a drop of lemongrass. This candle smells very fresh and I have been burning it this past week in the kitchen. It's filled up the kitchen with a lovely welcoming fresh smell, which you can notice as soon as you walk through the kitchen door.


I would 100% recommend Laura's candle making workshop and her candle creations. If you love candles for their scents, then you must definitely try her collection out.

Have you ever done a workshop like this before?
Amber X
© amberatlanta. Design by FCD.